Post info
Finally, this blog is no longer as Blogspot. It hosted to my own domain now. As you can see, the URL of this blog is www.raisyadhani.com, not flextramedia.blogspot.com anymore. That's so cool, I think.
Having a blog with our own top domain (without blogspot, wordpress, multiply, livejournal, ect...) will make our blog seems elite and ranked. That also make your blog easy to remembered by people. Then, how to make it like this blog? First you must buy a domain name. You can buy it at Namecheap.com at low price, for only $8 for one domain name .com. You can purchase it by using Paypal or some major credit cards. If your domain has successfully registered, then let's go to the next step in order to redirect your domain to your blog (I recommend you to using blogger/blogspot), like DNS, Name Server, ect...
SETTING DNS (DOMAIN NAME SERVER)
This is the first step to set your domain. Usually, there some additional fees to buy "DNS Managed". But you can still get it freely. follow the instruction below :
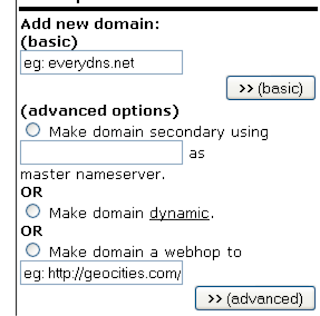
 1. Register on everydns.com for free. Then, login if you done.
2. On the Add new domain menu, you can fill column with your new domain (without www) then click basic button.
3. Or. you can use Advanced option menu .
4. Your domain name will appear in Domain List. Click your domain for the next step.
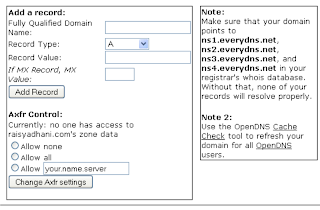
 5. On Add a record menu you can Fill "www" and record type drop down menu, choose CNAME .
8. in Record Value column Fill ghs.google.com in destination.
9. and at last click Add Record button.
SETTING NS (NAME SERVER)
If you use Namecheap as your domain account, you must do this :
1. Login to your Namecheap account. Click Manage Domain.
2. On the menu, click your domain name, then click domain Name server Setup on the left side menu. Fill the columns like this pics below :
ns1.everydns.net
ns2.everydns.net
ns3.everydns.net
ns4.everydns.net
Finished and save your works. Ups, still not finished yet. you still need to set your domain on your blog.
1. Login to your blogger, in your dashboard, click settings on your blog.
2. Choose Publishing menu. Then click switch to Custom domain. next Switch to advanced setting. Enter your domain name with www. Save if you done.
Congratulations! Your blog is already in your own domain name...


0 comments:
Post a Comment